Kali ini saya akan share gimana Cara Membuat Popular Post Warna Warni Di Blog Terbaru, silahkan ikuti tutorial langkah langkah berikut lengkap beserta gambarnya buat sobat yang ingin memasang / menambahkan widget most popular posts keren pada sidebar template blogger.
Cara Membuat Popular Post Warna Warni Di Blog :
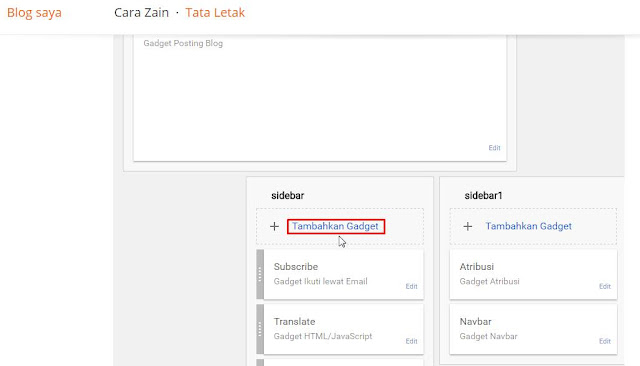
1. Bikin popular post warna warni seperti diatas yaitu dengan cara pertama masuk tata letak lalu klik Tambahkan Gadget pada bagian sidebar
2. Kemudian klik tombol tambah pada Entri Populer / Popular Post
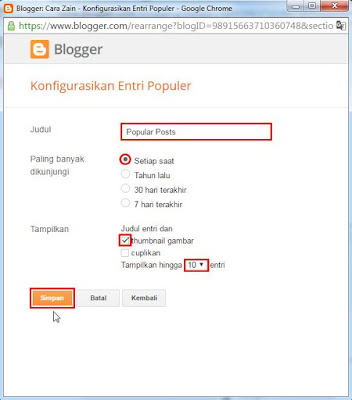
3. Setelah itu konfigurasi widget tersebut sesuai keinginan sobat, centang thumbnail gambar jika sobat ingin membuat populer post dengan gambar (with thumbnail) atau kosongkan bila ingin hanya judul (title only), jika sudah bisa klik tombol Simpan maka widget popular post biasa bawaan blogger sudah terpasang
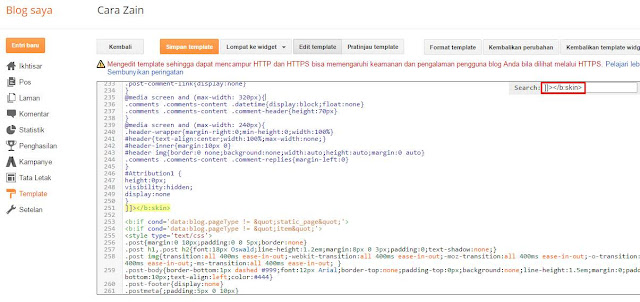
4. Selanjutnya kita akan mengubah nya menjadi lebih berwarna dan keren yaitu dengan cara masuk ke menu Template dan klik Edit HTML
5. Kemudian cari kode ]]></b:skin> atau </style>, gunakan Ctrl+F untuk memudahkan pencarian
6. Setelah itu silahkan sobat pilih dibawah ini ada beberapa pilihan tipe widget popular post yang berbagai macam bentuk dan warna yang keren dan bagus lalu copy script kode nya :
 |
| TIPE 1 |
/*----- TAB POPULER -----*/
#PopularPosts1 ul li a:hover{color:#fff;text-decoration:none}
#PopularPosts1 ul li a {-webkit-text-size-adjust: auto; -webkit-text-stroke-width: 0px; color: #333333; display: block; font-family: Georgia, 'Times New Roman', Times, serif; font-size: 13px; font-style: normal; font-variant: normal; font-weight: normal; letter-spacing: normal; line-height: 18px; margin: 0px 40px 0px 0px; min-height: 30px; orphans: 2; padding: 0px; text-align: -webkit-auto; text-decoration: none !important; text-indent: 0px; text-transform: none; white-space: normal; widows: 2; word-spacing: 0px;}
#PopularPosts1 ul li .item-thumbnail{float:left;border:0;margin-right:10px;background:transparent;padding:0;width:70px;height:63px}
#PopularPosts1 ul li:first-child:after,
#PopularPosts1 ul li:first-child + li:after,
#PopularPosts1 ul li:first-child + li + li:after,
#PopularPosts1 ul li:first-child + li + li + li:after,
#PopularPosts1 ul li:first-child + li + li + li + li:after,
#PopularPosts1 ul li:first-child + li + li + li + li + li:after,
#PopularPosts1 ul li:first-child + li + li + li + li + li + li:after,
#PopularPosts1 ul li:first-child + li + li + li + li + li + li + li:after,
#PopularPosts1 ul li:first-child + li + li + li + li + li + li + li + li:after,
#PopularPosts1 ul li:first-child + li + li + li + li + li + li + li + li + li:after{position:absolute;top:10px;right:5px;border-radius:50%;border:2px solid #ccc;background:#353535;-webkit-box-shadow:0px 0px 5px #000;-moz-box-shadow: 0px 0px 5px #000;width:30px;height:30px;line-height:1em;text-align:center;font-size:28px;color:#fff}
#PopularPosts1 ul li:first-child + li + li + li + li + li + li + li {background:#DF01D7;width:90%}
#PopularPosts1 ul li:first-child + li + li + li + li + li + li + li:after{content:"8"}
#PopularPosts1 ul li:first-child + li + li + li + li + li + li + li +li{background:#B041FF;width:90%}
#PopularPosts1 ul li:first-child + li + li + li + li + li + li + li + li:after{content:"9"}
#PopularPosts1 ul li:first-child + li + li + li + li + li + li + li +li +li{background:#F52887;width:90%}
#PopularPosts1 ul li:first-child + li + li + li + li + li + li + li + li + li:after{content:"10"}
#PopularPosts1 ul li:first-child + li + li + li + li +li{background:#7ee3c7;width:90%}
#PopularPosts1 ul li:first-child + li + li + li + li + li:after{content:"6"}
#PopularPosts1 ul li:first-child + li + li + li + li + li +li{background:#f6993d;width:90%}
#PopularPosts1 ul li:first-child + li + li + li + li + li + li:after{content:"7"}
#PopularPosts1 ul li:first-child + li + li + li + li{background:#33c9f7;width:90%}
#PopularPosts1 ul li:first-child + li + li + li + li:after{content:"5"}
#PopularPosts1 ul li:first-child + li + li + li{background:#c7f25f;width:90%}
#PopularPosts1 ul li:first-child + li + li + li:after{content:"4"}
#PopularPosts1 ul li:first-child + li + li{background:#ffde4c;width:90%}
#PopularPosts1 ul li:first-child + li + li:after{content:"3"}
#PopularPosts1 ul li:first-child + li{background:#ff764c; width:90%}
#PopularPosts1 ul li:first-child + li:after{content:"2"}
#PopularPosts1 ul li:first-child{background:#ff4c54 ;width:90%}
#PopularPosts1 ul li:first-child:after{content:"1"}
#PopularPosts1 ul{margin:0;padding:0px 0;list-style-type:none}
#PopularPosts1 ul li{position:relative;margin:6px 0;border-radius:25px 0px 25px 0px;border:2px solid #f7f7f7;-webkit-box-shadow:3px 3px 3px #000;-moz-box-shadow: 3px 3px 3px #000;padding:10px}
 |
| TIPE 2 |
/*Custom Popular Post*/
.PopularPosts ul,.PopularPosts li,.PopularPosts li img,.PopularPosts li a,.PopularPosts li a img{margin:0 0;padding:0 0;list-style:none;border:none;background:none;outline:none}
.PopularPosts ul{margin:.5em 0;list-style:none;color:black;counter-reset:num}
.PopularPosts ul li{background-color:#eee;margin:0 0 0 0!important;padding:.5em 1.5em .5em .5em!important;counter-increment:num;position:relative}
.PopularPosts ul li a{color:#fff!important}
.PopularPosts ul li a:hover{color:#2c3e50!important}
.PopularPosts ul li:before,.PopularPosts ul li .item-title a,.PopularPosts ul li a{font-weight:bold;color:inherit;text-decoration:none}
.PopularPosts ul li:before{content:counter(num)!important;display:block;position:absolute;background-color:#333;color:#fff!important;width:22px;height:22px;line-height:22px;text-align:center;bottom:0;right:0;padding-right:0!important}
/* Pengaturan Warna */
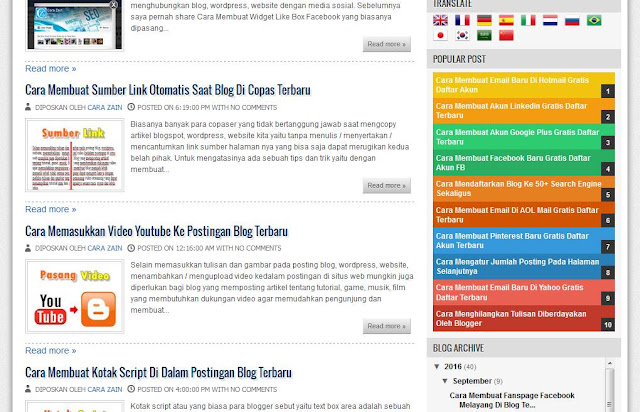
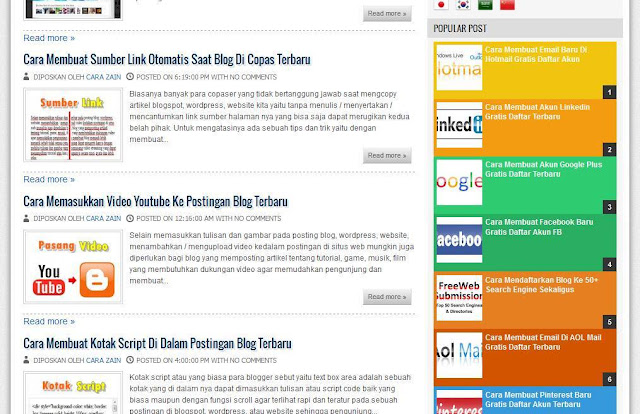
.PopularPosts ul li:nth-child(1){background-color:#f1c40f;}
.PopularPosts ul li:nth-child(2){background-color:#f39c12;}
.PopularPosts ul li:nth-child(3){background-color:#2ecc71;}
.PopularPosts ul li:nth-child(4){background-color:#27ae60;}
.PopularPosts ul li:nth-child(5){background-color:#e67e22;}
.PopularPosts ul li:nth-child(6){background-color:#d35400;}
.PopularPosts ul li:nth-child(7){background-color:#3498db;}
.PopularPosts ul li:nth-child(8){background-color:#2980b9;}
.PopularPosts ul li:nth-child(9){background-color:#ea6153;}
.PopularPosts ul li:nth-child(10){background-color:#c0392b;}
.PopularPosts .item-thumbnail{margin:0 7 0 0}
.PopularPosts .item-snippet{font-size:11px}
 |
| TIPE 3 |
/* Popular Post */
.PopularPosts ul,
.PopularPosts li,
.PopularPosts li img,
.PopularPosts li a,
.PopularPosts li a img {
margin:0 0;
padding:0 0;
list-style:none;
border:none;
background:none;
outline:none;
}
.PopularPosts ul {
margin:.5em 0;
list-style:none;
color:black;
counter-reset:num;
}
.PopularPosts ul li img {
display:block;
margin:0 .5em 0 0;
width:50px;
height:50px;
float:left;
}
.PopularPosts ul li {
background-color:#eee;
margin:0 10% .4em 0 !important;
padding:.5em 1.5em .5em .5em !important;
counter-increment:num;
position:relative;
}
.PopularPosts ul li:before,
.PopularPosts ul li .item-title a, .PopularPosts ul li a {
font-weight:normal;
color:#000 !important;
text-decoration:none;
}
.PopularPosts ul li:before {
content:counter(num) !important;
display:block;
position:absolute;
background-color:#333;
color:#fff !important;
width:22px;
height:22px;
line-height:22px;
text-align:center;
top:0px;
right:0px;
padding-right:0px !important;
}
/* Set color and level */
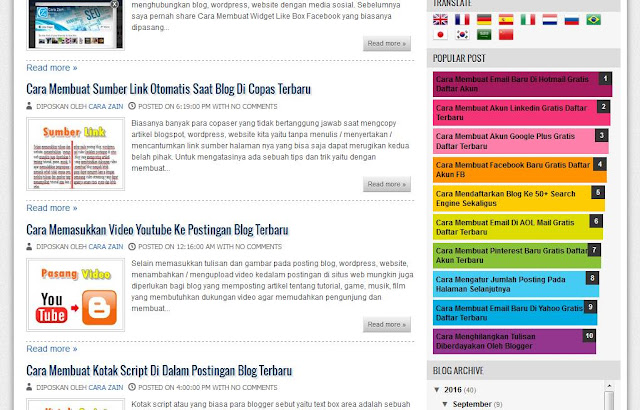
.PopularPosts ul li:nth-child(1) {background-color:#A51A5D;margin-right:1% !important}
.PopularPosts ul li:nth-child(2) {background-color:#F53477;margin-right:2% !important}
.PopularPosts ul li:nth-child(3) {background-color:#FD7FAA;margin-right:3% !important}
.PopularPosts ul li:nth-child(4) {background-color:#FF9201;margin-right:4% !important}
.PopularPosts ul li:nth-child(5) {background-color:#FDCB01;margin-right:5% !important}
.PopularPosts ul li:nth-child(6) {background-color:#DEDB00;margin-right:6% !important}
.PopularPosts ul li:nth-child(7) {background-color:#89C237;margin-right:7% !important}
.PopularPosts ul li:nth-child(8) {background-color:#44CCF2;margin-right:8% !important}
.PopularPosts ul li:nth-child(9) {background-color:#01ACE2;margin-right:9% !important}
.PopularPosts ul li:nth-child(10) {background-color:#94368E;margin-right:10% !important}
.PopularPosts .item-thumbnail {
margin:0 0 0 0;
}
.PopularPosts .item-snippet {
font-size:11px;
}
.widget-content ul li{margin:0;padding:6px 0px;border-bottom:1px solid #ededed
}
.widget-content ul li:last-child{border-bottom:medium none !important
}
.widget-content ul li a{color:#333
}
.widget-content ul li a:hover{color:#C80441
}
.item-date {font-size:11px;font-style:italic;font-weight:bold;color:#FFCC00
}
 |
| TIPE 4 |
.PopularPosts ul,.PopularPosts li,.PopularPosts li a{margin:0;padding:0;list-style:none;border:none;background:none;outline:none}.PopularPosts ul{margin:0;list-style:none;color:black;counter-reset:num}.PopularPosts ul li{background-color:#eee;margin:0 0 0 0!important;padding:.5em 1.5em .5em .5em!important;counter-increment:num;position:relative}.item-thumbnail img{float:left;margin:0 10px 0 0}.PopularPosts a{color:#fff!important}.PopularPosts a:hover{color:#222!important}.PopularPosts ul li:before,.PopularPosts ul li .item-title a,.PopularPosts ul li a{font-weight:bold;color:inherit;text-decoration:none}.PopularPosts ul li:before{content:counter(num)!important;display:block;position:absolute;background-color:#333;color:#fff!important;width:22px;height:22px;line-height:22px;text-align:center;bottom:0;right:0;padding-right:0!important}.PopularPosts ul li:nth-child(1){background-color:#A51A5D}.PopularPosts ul li:nth-child(2){background-color:#F53477}.PopularPosts ul li:nth-child(3){background-color:#FD7FAA}.PopularPosts ul li:nth-child(4){background-color:#FF9201}.PopularPosts ul li:nth-child(5){background-color:#FDCB01}.PopularPosts ul li:nth-child(6){background-color:#DEDB00}.PopularPosts ul li:nth-child(7){background-color:#89C237}.PopularPosts ul li:nth-child(8){background-color:#44CCF2}.PopularPosts ul li:nth-child(9){background-color:#01ACE2}.PopularPosts ul li:nth-child(10){background-color:#94368E}.cloud-label-widget-content{text-align:left}.label-size{display:block;background:#fff;float:left;margin:0 2px 2px 0;color:#000!important;border:1px solid #ccc;padding:5px}.label-size:hover{border:1px solid #000;color:#000!important}.label-size a:hover{color:#000!important}
 |
| TIPE 5 |
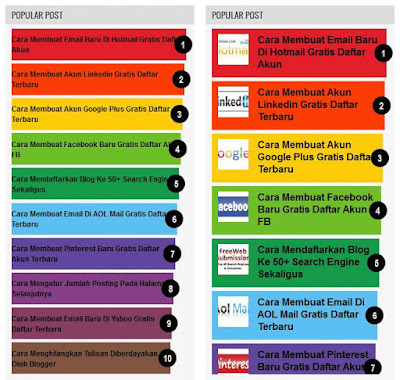
/* Pengaturan Warna */ .PopularPosts ul li:nth-child(1) {background-color:#E11E28;margin-right:1%} .PopularPosts ul li:nth-child(2) {background-color:#FD3C03;margin-right:2%} .PopularPosts ul li:nth-child(3) {background-color:#FECB09;margin-right:3%} .PopularPosts ul li:nth-child(4) {background-color:#6EBE27;margin-right:4%} .PopularPosts ul li:nth-child(5) {background-color:#149A48;margin-right:5%} .PopularPosts ul li:nth-child(6) {background-color:#5BBFF1;margin-right:6%} .PopularPosts ul li:nth-child(7) {background-color:#61469C;margin-right:7%} .PopularPosts ul li:nth-child(8) {background-color:#863E86;margin-right:8%} .PopularPosts ul li:nth-child(9) {background-color:#863E62;margin-right:9%} .PopularPosts ul li:nth-child(10) {background-color:#815540;margin-right:10%} /*Custom Popular Post*/ .PopularPosts ul, .PopularPosts li, .PopularPosts li img, .PopularPosts li a, .PopularPosts li a img { margin:0 0; padding:0 0; list-style:none; border:none; background:none; outline:none;} .PopularPosts ul { margin:.5em 0; list-style:none; font:normal normal 13px/1.4 "Arial Narrow",Arial,Sans-Serif; color:black; counter-reset:num;} .PopularPosts ul li img { display:block; margin:0 10px 0 10px; width:50px; height:50px; float:left;} .PopularPosts ul li { background-color:#eee; margin:0 10% .4em 0; padding:.5em 1.5em .5em .5em; counter-increment:num; position:relative;} .PopularPosts ul li:before, .PopularPosts ul li .item-title a { font-weight:bold; font-size:120%; color:inherit; text-decoration:none;} .PopularPosts ul li:before { content:counter(num); display:block; position:absolute; background-color:black; color:white; width:30px; height:30px; line-height:30px; text-align:center; top:50%; right:-10px; margin-top:-15px; -webkit-border-radius:30px; -moz-border-radius:30px; border-radius:30px;}
Jika sudah memilih tipe dari widget tersebut dan copy scriptnya selanjutnya masukkan script tersebut tepat diatas kode ]]></b:skin> atau </style> seperti pada gambar dibawah ini dan klik Simpan template.. Selesai dan lihat hasilnya
7. Berikut adalah tampilan tampilan blog yang berhasil atau work 100% dalam membuat popular post warna warni dengan berbagai tipe :
 |
| TIPE 1 ( TITLE ONLY) |
 |
| TIPE 1 (WITH THUMBNAIL) |
 |
| TIPE 2 (TITLE ONLY) |
 |
| TIPE 2 (WITH THUMBNAIL) |
 |
| TIPE 3 (TITLE ONLY) |
 |
| TIPE 3 (WITH THUMBNAIL) |
 |
| TIPE 4 (TITLE ONLY) |
 |
| TIPE 4 (WITH THUMBNAIL) |
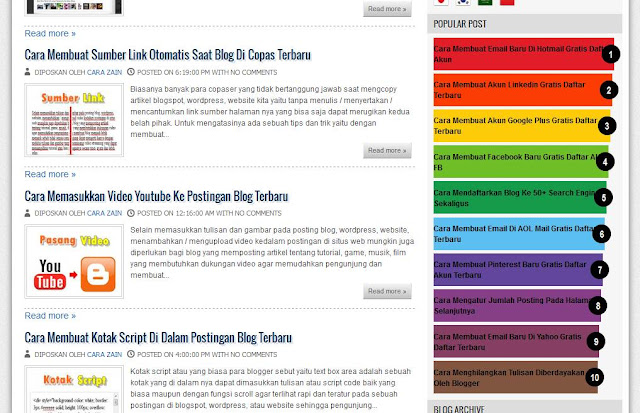 |
| TIPE 5 (TITLE ONLY) |
 |
| TIPE 5 (WITH THUMBNAIL) |
Nah itulah bagaimana cara membuat popular post warna warni di blog dengan mudah dan cepat.
Silahkan dicoba




Bosan tidak tahu mau mengerjakan apa pada saat santai, ayo segera uji keberuntungan kalian
ReplyDeletehanya di D*E*W*A*P*K / pin bb D87604A1
dengan hanya minimal deposit 10.000 kalian bisa memenangkan uang jutaan rupiah
dapatkan juga bonus rollingan 0.3% dan refferal 10% :)
ReplyDeleteadmin numpang promo ya.. :)
cuma di sini tempat judi online yang aman dan terpecaya di indoneisa
banyak kejutan menanti para temen sekalian
cuma di sini agent judi online dengan proses cepat kurang dari 2 menit :)
ayo segera bergabung di fansbetting atau add WA +855 9631562 ^^
F4ns Bett1ng agen judi online aman dan terpercaya
Jangan ragu, menang berapa pun pasti kami proseskan..
F4ns Bett1ng
B0l4, C4sin0, s4bun9 4yam, T0gel dll.. dp50 wd50
di tunggu pendaftaran nya ya para boskuu :D